
Video Conferencing in Teams
- Apr 3, 2020
- 5 min read
Updated: Apr 14, 2020
In the wake of COVID-19, many businesses are primarily using Zoom for remote video conferences, and while Zoom has been a useful tool, recently revealed security flaws within the platform may make your organization re-think its validity. Instead of using Zoom, a lot of organizations are turning to Microsoft Teams to fill that role. Why Teams? Well, Teams is a Microsoft based application that many organizations already have. It is a powerful tool that can be used in many different areas of business to allow departments to communicate, stay on task, be organized, and still work efficiently when not sitting together.
With most companies working from home, it is important that they are selecting a tool that is easy to use, within budget, and quick to deploy. Why not use a tool that is already in your toolbox? Teams can be utilized for so much more than video conferencing. It can be used to track tasks, be a file repository, store Wikis, collaborate on documents, worksheets, PowerPoints, and more! Video conferencing is the just the tip of the iceberg in regard to what Teams is capable of.
Although Teams is capable of many things, today we are focusing on the videoconferencing functionality. In this article, we will outline the two ways of setting up a video conference meeting, show you how to record and download a video file of the meeting itself, and point out some other nice features, such as video recording, captioning, chatting, and note taking while in meetings.
If your organization already has an Office 365 license, there are no additional costs to using Teams. For external participants, audio and video are available for any user. Invitees without an Office 365 license are unable to use the text chat function or share files within the meeting.
The first step to starting a meeting in Teams is to open the Calendar tab. You’ll see two options on the top right. ‘Meet now’ will immediately create a meeting and will allow you to invite attendees once you’ve joined the meeting yourself. ‘New meeting’ will schedule one for the date and time you desire, also allowing you to invite attendees ahead of time.

Setting up a video conference using ‘Meet now’
When doing a ‘Meet now’ meeting, this is the initial setup screen you will see. You will need to hit ‘Join now’ in order to invite people to your meeting. Below ‘Join now’ are three sliders. First on the left is Camera, which is enabled in my screenshot. This will broadcast your face to the attendees. When you turn your video on you will be able to see a preview before joining to the meeting. This allows you to make any adjustments before you are ‘live’. The middle slider is background blur, which is disabled for me. This option blurs out your background and keeps only you clear. This option is nice to use if you have confidential information visible nearby, or if you’re meeting in a public place and want to respect others’ privacy. The third slider is the microphone, which allows others to hear you.

This may sound counter-intuitive, but to invite people to your ‘Meet now’ meeting, you will need to hit ‘close’ on the top right of the last screen. This will pop up the chat window, shown below. To the right of ‘Join’ is the invite button. Clicking on this will pop up a search box which you can use to add your colleagues to the meeting. When all invites are sent, hit ‘Join’ again to re-connect to your meeting.

Setting up a video conference using the calendar
If your meeting was not a ‘Meet now’ meeting, but was instead scheduled on the calendar, the process for recording and downloading the video file remains the same. The only difference between the two is that scheduled meetings involve inviting attendees before it begins.
Start by opening your calendar in Teams and choose "+ New meeting”.

The next part will be entering your meeting title, adding attendees, and setting the time/location. This is also where you would configure reoccurring options as well.

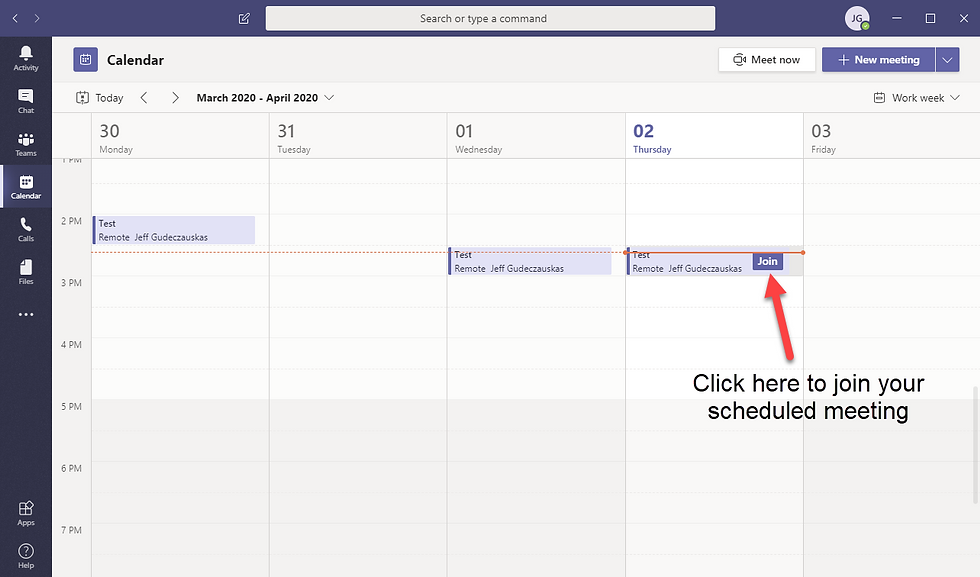
To join your scheduled meeting, open the calendar in Teams. Find your meeting’s time slot and click ‘Join’. This also applies if someone else created the meeting and invited you to it.
Ensure that your microphone and camera settings are accurate and select Join Now.

Recording a Video Conference
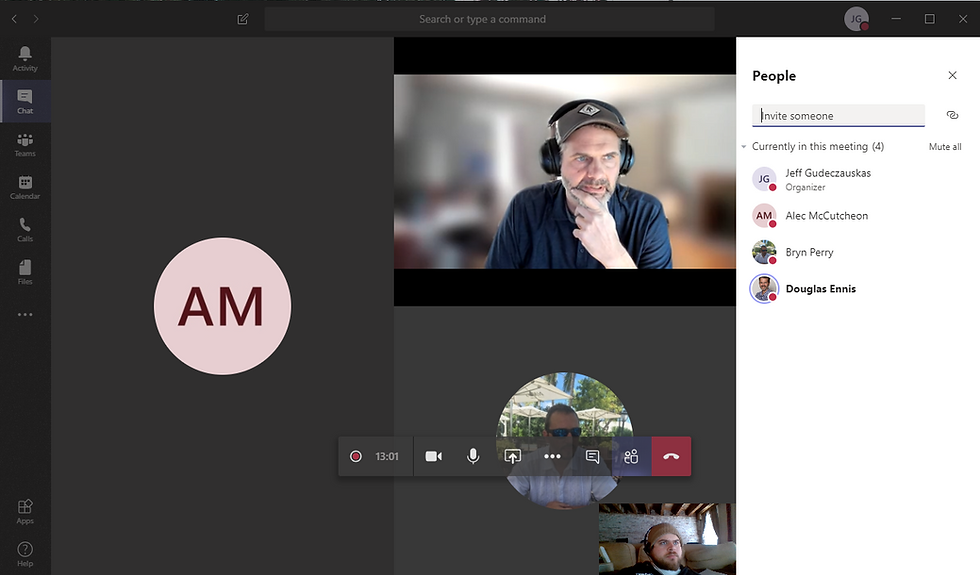
Once you’re connected to the meeting and all invites have been sent, you can begin recording the meeting. On your toolbar (shown below), click the ellipses to pop up a settings menu. Choose ‘Start recording’ and Teams will begin recording your meeting. When you are finished recording, click those same ellipses and choose ‘Stop recording’ instead.

When you choose to record a meeting, attendees will be notified at the start and end of the recording with a banner as shown below.


To download the .MP4 file of your meeting, first hit the red “hang up” button on your toolbar. This will bring you back to the Meeting chat window (shown below). Depending on the length of your meeting, it may take Teams a few minutes to upload the video of your meeting, so be patient! Once the meeting does show up, as shown below, click on the ellipses on its right side and select ‘Open in Microsoft Stream’.

This will open Stream in your web browser. You may need to sign into Office 365 to proceed. Click the ellipses below the video to pop up a menu. Select ‘Download video’ to download it to your computer.

Screen Sharing
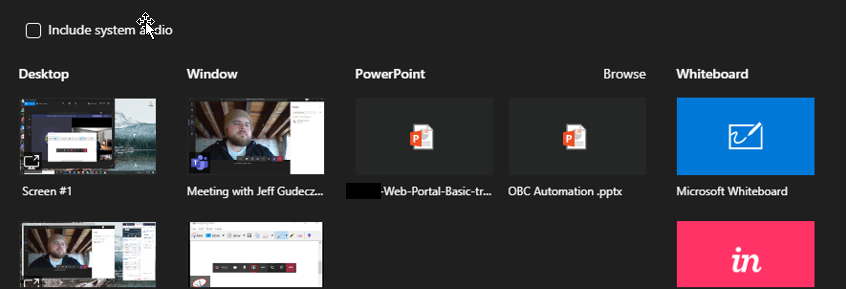
To share your screen, click the Share button to the left of the ellipses on your meeting toolbar.

A menu will pop up on the bottom of your Teams window. You will see columns with labels, e.g. Desktop, Window, PowerPoint, etc. ‘Desktop’ shows the screens of each monitor connected to your workstation. This will allow you to share whatever is happening on a monitor. ‘Window’ shows open applications and will only share what is happening in the specific application window you choose. ‘PowerPoint’ allows you to share .ppt files currently saved in your Sharepoint. ‘Whiteboard’ allows you to mark up your screen in real time and share it with your viewers; like a digital version of a classroom whiteboard.
If you choose to show one of your monitors, the chosen monitor will be outlined in red. See below for an example.

Chat
Teams allows you and all meeting attendees to use a text chat function. You can access this during the meeting by bringing up your toolbar and selecting the dialogue window to the right of the ellipses.

Click on the dialogue window and the meeting’s chat room appears on the right side of Teams.

Another great function of this chat room is the ability to create meeting notes. If someone uses this function, it will appear in the chat room like what is shown above. Note where it says Doug “created meeting notes for this meeting”. These notes are saved as a OneNote document and can be accessed through Teams or SharePoint after the meeting if you want to review.

You can also access the meeting notes while still in the meeting by clicking the ellipses on the toolbar and selecting “Show meeting notes”.

Captions
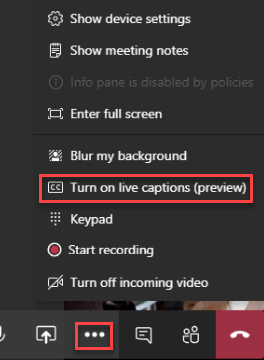
For attendees with too much background noise or for those hard of hearing, Teams has a built-in captioning function that does a great job translating speech to text. To enable captioning, click the ellipses on the toolbar and select “Turn on live captions (preview)”.
Once that option is selected, all speech will be translated into text on the bottom of your Teams window. We found it remarkable how accurate the translation is!

As you can see, Teams is a power tool that does more than just allow you to see and hear others. From our experience, Team is leading the way for all-in-one tools. The video quality is strong, the functionality is robust, and it is an easy to use collaboration tool.
Stay tuned for more tips and tricks on Teams and other tools!


Comments